Workflow Editor
Workflows determine where your form goes after it’s filled out. Let’s say you need several people to approve a purchase request. You want this done in specific order: first the purchasing agent must perform a procurement review, then the department manager must decide if the expense is feasible, and then the CFO must give final approval.
To get this process started, create a workflow for your request form where you specify the first person, second person, third person, and so on to handle the request. Once it has passed all of its approval steps, you’ll receive the relevant notification.
Of course, not all workflows are this straightforward. Sometimes you need an external approver to step into the workflow, e.g. to have the CEO approve invoice totals that exceed a certain amount. Pyrus’s solution for these scenarios is the conditional workflow.
Every form has a workflow editor. To access it, click Workflow.

Subscribers role
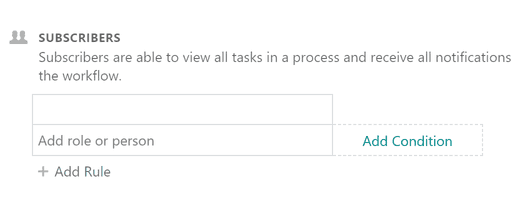
Subscribers are participants of a workflow whom no action is required to keep the task moving along. Anyone mentioned in the comments automatically becomes a Subscriber, and the task can continue through the workflow without them signing off on it. The Subscriber will still receive notifications on all tasks and will be able to comment and attach files.
If you want a particular person to monitor every request of a certain type — for example, if you want your CFO to be cc:d on all payment approvals without having to approve — go into form Configure, then Workflow, and add the contact you need to the Subscribers section.
Pyrus Tip: In the Workflow editor, you can set a rule that only the Form admin can add approvers, assignees, and subscribers forms, as well as add the form to lists.

Workflow steps
Workflow logic is defined by sequential steps. You assign each step to one or more people, and they handle the request when the moment calls for it.
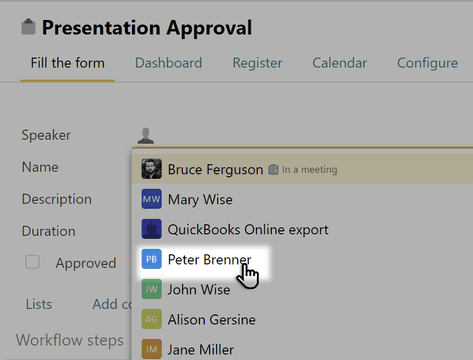
Click Add New Step and enter the step name, then click Add person or role and select the person responsible for this step. The request will first go to step 1, then to step 2, and so on.
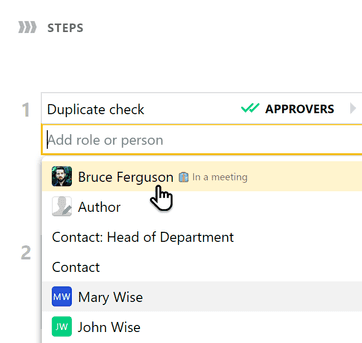
You can appoint a role, a specific person, several people, the author of the request, or anyone in the Contact field to approve a step.
Pyrus Tip: As you type a person’s name or role, Pyrus will auto-fill a list of potential matches for faster lookup.

Roles are your best choice, as they help maintain business continuity. A role includes a number of employees, e.g. the Accounting role may consist of both the senior accountant and his or her deputy, the Client Support role can include three interchangeable managers, and so on. If a manager takes vacation or sick leave, a coworker will take over the request. But if a step only has one approver and that person is absent, those requests will pile up and you’ll have to look for someone else to fill in.
Use the Queue feature when assigning roles. When it’s on, the first to open the request handles it in one of the next steps. For this to work, designate “Person approved step #...” as the approver in the relevant step. Otherwise the request may get lost.
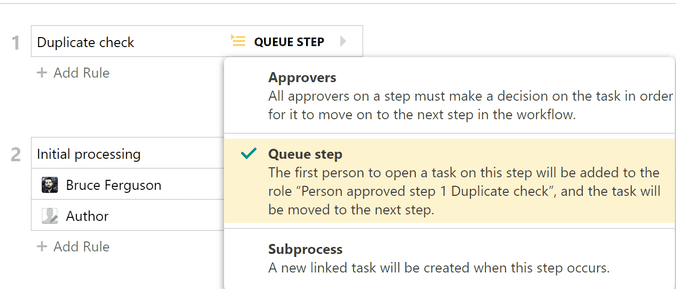
If you’ve appointed several individuals to approve a step, each of them will see the task in their Inbox. The task won’t advance through the workflow until each approver responds to it with either Approve, Reject, or Acknowledge.
Pyrus Tip: There can be up to 20 steps in one workflow, which is enough to complete any business process.
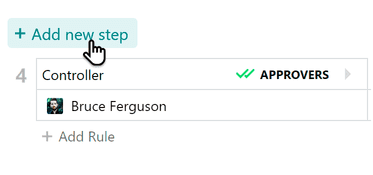
You can edit the initial sequence to add intermediate steps to your workflow. Hover over the step where you want to make a new one (either before or after it), and click Add new step.
Note: the new workflow will take effect for each new request. For a request in progress the new workflow will be applied as soon as you edit a request, approve it, or add to a list.
If a request has been approved at its first and second steps, then a new step appears in between them, the request will be returned to that intermediate step for approval.
The list of people or roles assigned will be updated as well. The coordinators from the previous version of the workflow will remain at the same stages as before.
Suppose your workflow has four steps:
- GL Coding
- Controller approval
- CFO approval
- Release for export
We added the Supervisor step before Controller. Now the sequence looks like this:
- GL Coding
- Supervisor approval
- Controller approval
- CFO approval
- Release for export
Assignees from the initial sequence will remain on the same steps in a new workflow, and new assignees will be added as well. 
You can manually delete any remaining assignees from the workflow editor.
Pyrus Tip: Requests that are on the same stage can be processed one after the other, like on a conveyor belt, without having to retrieve the next one from the Inbox.
Just hit the Process button in the Inbox.
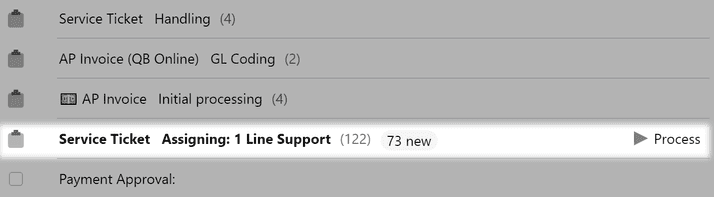
For the conveyor to work, requests of the same form type must be grouped in the Inbox.
For this check the appropriate box in inbox display settings in the upper right corner of the screen.
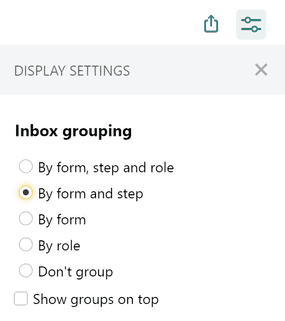
Also, you have to turn on Queue mode in the form workflow.
You can remove steps by clicking the trashcan icon next to the step name.

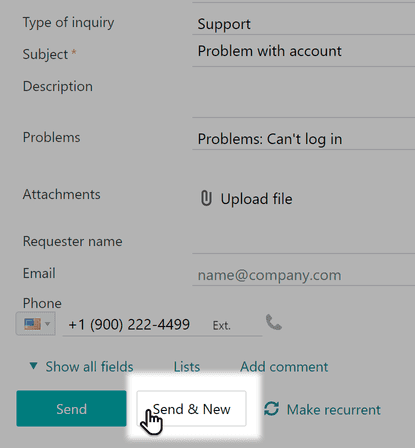
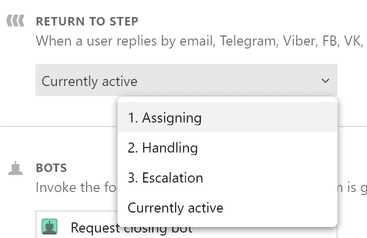
Pyrus Tip: Say a client writes to a support team member or client manager, about some new details that have come to light and require a task to be taken back to a previous step. For cases like these, you can set the step to which the task will revert when a user writes from an outside channel in the form routing settings.
Workflow rules
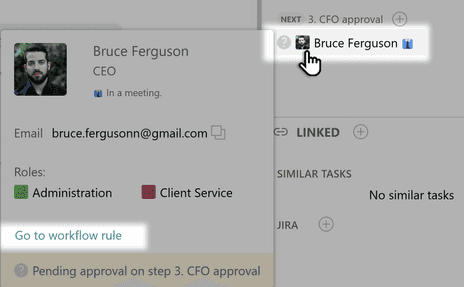
Note: if you have access to edit the workflow, you can access the workflow rules directly from the task form — just hover over any approver in the step and click the corresponding button.
Workflow conditions
You can use branching logic by conditioning your workflow steps. Conditions determine the instances in which the person or role responsible for the step will handle the request. Conditions let you have a client request automatically forwarded to the relevant manager, or have only specific types of invoices submitted for the CEO’s approval.
To create a condition for a specific step, click Add Condition next to the approver’s name and select a request field from the dropdown list.
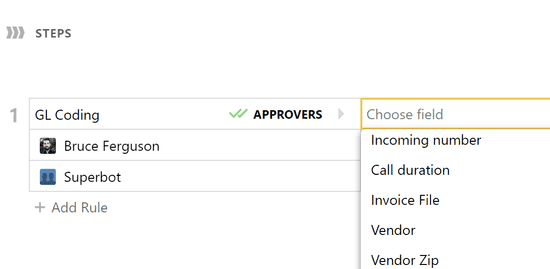
Conditions are currently available for the Money, Number, Text, Catalog, Contact, Check Mark, and Multiple Choice fields.
Money and Number
The Money and Number fields support the following conditions:
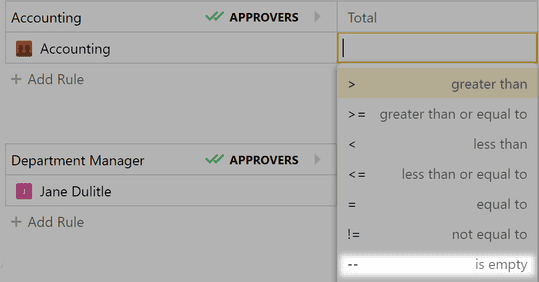
- Greater than. Your CEO only wants to approve invoices of $2,500 or higher. Choose the Invoice Total field, click greater than in the dropdown list, and type in “2500”. If the invoice total is less than $2,500, the CEO won’t receive it for approval, and the request will go to the next step. If it’s greater than $2,500, the CEO will join in the review. The Conditions less than, equal to, greater than or equal to, less than or equal to, and not equal to are used similarly.

- Is filled and is empty. Let’s say an employee wants the firm to buy her a new chair and fills out a purchase request. The first step of the workflow — Accounting — is conditioned with is empty. Now, if the employee knows how much she can spend on the new chair and fills in the Price field, the request will skip the first step and go straight to her manager for approval. But if she leaves the Price field empty, the condition for step one will be fulfilled and the request will first go to Accounting. The is filled condition is used similarly.
- Interval. This condition may come in handy if you need to set a range of values, e.g. $2,500 to $10,000.
Catalog and Text
The Catalog and Text fields support the same conditions:
- Equal to. Suppose you want all technical issues to be handled by 1 Line Support. Click Choose field and then equal to. Click “Technical Issue” in the dropdown list if it’s a catalog, or type in the value by hand if it’s a text field. Now clients’ technical issues will go straight to 1 Line Support.

- Not equal to. If you want 1 Line Support to process all helpdesk queries except sales questions, choose “not equal to Sales Question”, and sales-related requests will go past 1 Line Support to the next step.

Is filled and is empty. When applied to Catalog and Text fields, these conditions trigger the same kind of actions that they do in Money.
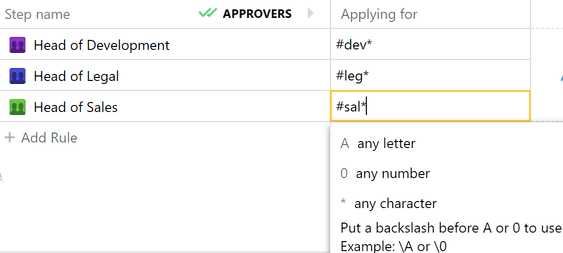
Matches. This condition is used for mask-defined fields. A mask is a code that determines a field’s specific pattern, like catalog numbers, account numbers, or passport details. For instance, you can use matches in a job application form where the candidate can choose the position from a dropdown list:
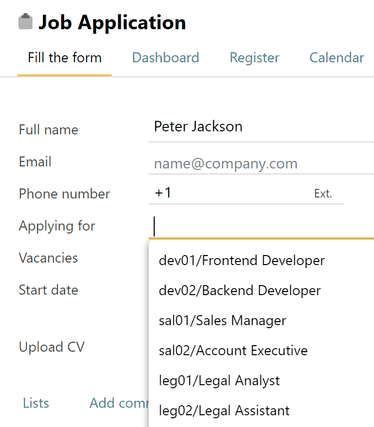
Set a mask that matches the first few letters of a job’s ID code to send it straight to the head of the respective department. The # denotes the mask and the * denotes any sequence of characters.
Check Mark and Contact
These two fields only support is filled and is empty:
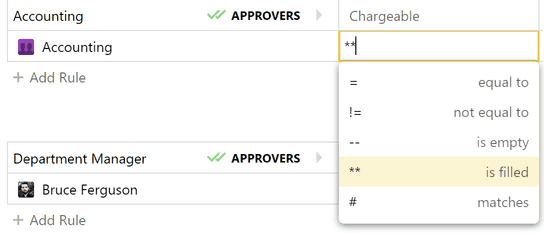
- Is filled. Let’s say an employee is filling out a timesheet that contains the field "Chargeable", which determines if the employee’s supposed to be paid for certain hours. If he checks the field, the approval request will be first submitted to Accounting, but if he doesn't, the timesheet will skip step one and go straight to the department manager for review.
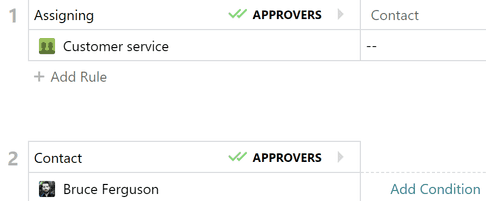
- Is empty. When applied to a Contact field, this condition is great for assigning client queries. For example, a client states her personal manager’s name in the Contact field of the request form. If step one — Assigning — has the is empty condition for Contact, the request skips it and goes straight to the step whose approver is the above-mentioned manager. If the client doesn’t know the manager’s name and leaves the Contact field empty, the request goes to 1 Line Support.
Multiple Choice
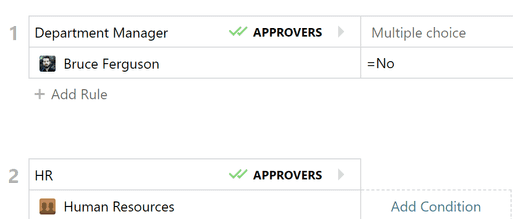
The Multiple Choice field supports equal to, is filled, and is empty. You can come across this field in a vacation approval form, where an employee can choose whether his vacation is scheduled by clicking “yes”, “no”, or “not set”. If you want all unscheduled vacations to go through the department manager first, select “equal to no”. The is filled and is empty conditions trigger the same kind of actions that they do in other fields.
Author
The Author field supports the equal to and not equal to conditions.
- Equal to. Suppose you are supervising the work of a new employee or helping your designer with prototypes. Select the Author field, choose Equal to, and add your colleague’s name. Now every task they create will be sent to your Inbox.

- Not equal to. This condition works in the opposite way — you will receive tasks from everyone except the author.
Combining conditions
You can create more than one condition for an individual step. The request will make it to the approver if all conditions are met. For example, the invoice will be forwarded to the CEO only if it’s both worth more than $10,000 and falls under the “Investments” category.

You can remove conditions by clicking the trashcan next to the condition name.

Workflow catalog
Businesses that expand rapidly, like restaurant chains or financial institutions, may face the issue of having to manually add new employees to their workflows every time a new restaurant or branch opens.
This process can be automated with a workflow catalog. You create a catalog of your company’s branch offices, indicate each branch’s director and key employees, and then use this catalog in workflows to distribute requests and submissions to the relevant branch. If a new store, restaurant, or branch opens, you can add it to the catalog just once, and the workflows change accordingly.
- Create an empty catalog. More on creating catalogs.
- Add the names or locations of your offices, stores, or restaurants. Press Add workflow column.
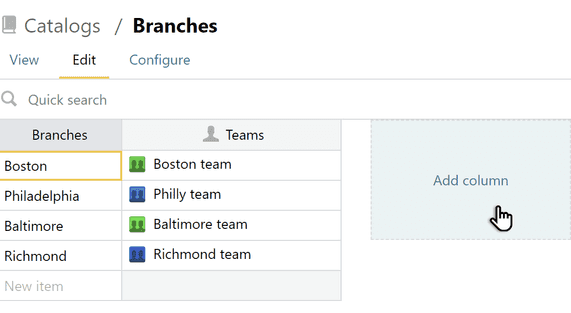
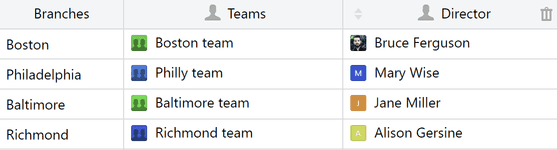
- Give the column a name, for example Director. An empty column will appear for you to add the company’s employees. Click on the cell opposite a branch and find that branch’s director in the drop down list.

- Create another workflow column, for example Teams. This column will accommodate the employees at each individual branch. First, create a role that incorporates a branch’s key employees and place it in the cell opposite the branch’s name. More on roles and how to create them.
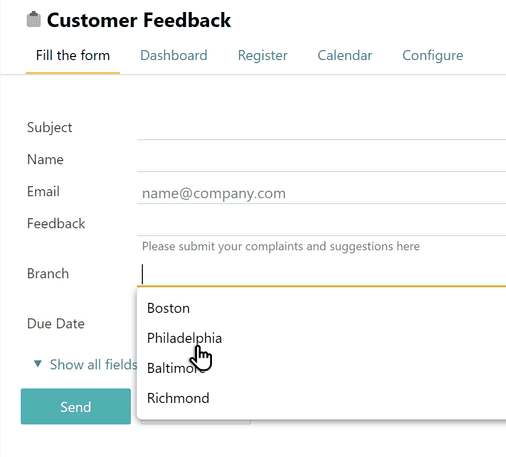
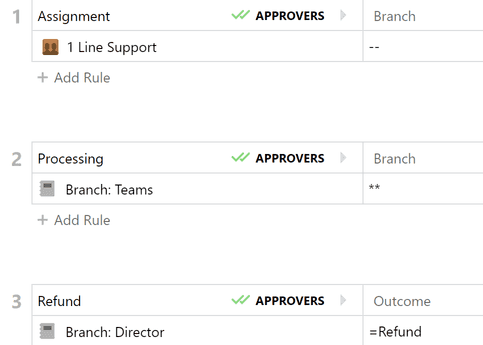
- Now you can use the catalog in a workflow. First add it to the form template. More on adding catalogs to forms. We added a workflow catalog to a Customer Feedback form below.
- Go to the Workflow editor, click Add new step, and then Add role or person. The list of potential approvers now contains the workflow catalog. It’s displayed as {Field name: Column name}. In this case it’s Branches: Director and Branches: Teams.
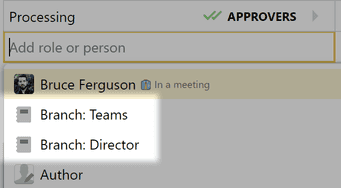
- Select the Branches: Teams column. Now, if a client filling out the Customer Feedback form selects Philadelphia as the branch that provided the services in question, the form will go to the Philadelphia team* role for processing.
Use the Director column in your workflow to inform branch directors of more serious issues like refund requests. In the example below, the form will be forwarded to the branch director if the client is asking for his or her money back.
Routing by department
Some requests like vacations or business trips need to be approved by the requestor’s supervisor first. There may be dozens of supervisors in an organization, so you can route them by department to avoid adding each one to the workflow.
This type of routing uses an organization structure catalog. Here’s an example of what it can look like:
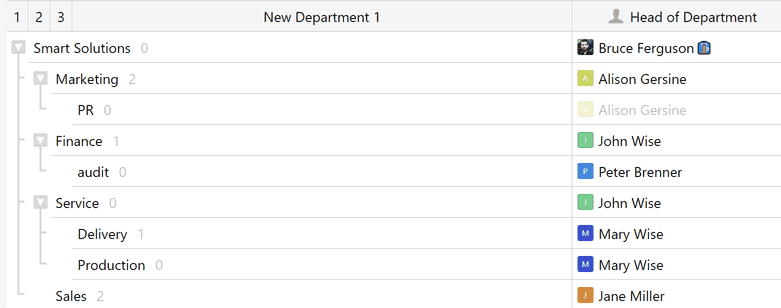
For more information on the organization catalog, see Organization structure.
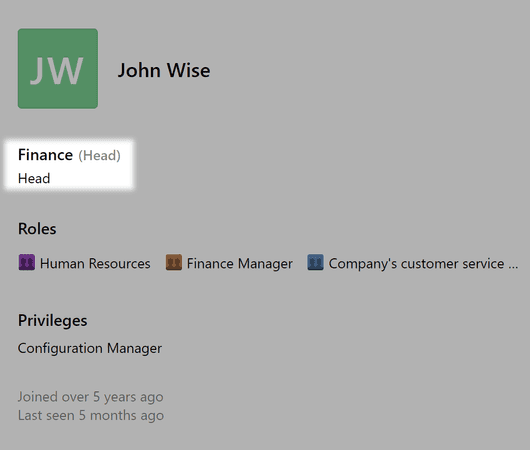
To enable routing by department, an employee’s department should be designated in user profile.
Note: if the department head isn’t designated, requests go to a manager who is higher in the hierarchy by default. In the orgchart, you will see this person’s name in a pale gray font.
Configuring the routing
Let’s use a business trip request form as an example, and a basic catalog with two columns — "Department" and "Head of Department."
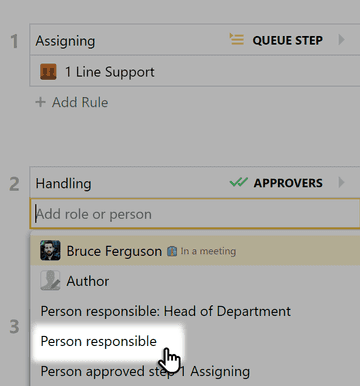
We want requests to be routed to the requestor’s supervisor first. Click on Add rule and select the option that looks like {Contact field name: Workflow column name}. In this case, it’s “Assignee: Head of Department.” Hit Save.
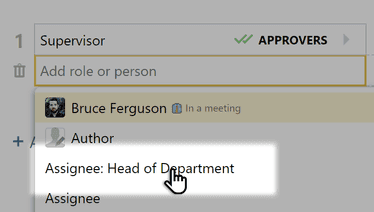
Now business trip requests from finance department employees will go straight to their supervisor. If a request is submitted by someone from advertising, it will be forwarded to the head of the advertising department.
This type of routing can be used in other scenarios as well. If you own a supermarket chain, for instance, you can use it in your purchasing workflow to route purchasing requests to specific store managers. When a store’s logistics manager submits a purchasing request for approval, it will go straight to the manager of that specific store.
Note: You might be wondering if it’s easier to simply add all of the supervisors to the workflow and set a “=department name” condition for each of them. It’s not. It will definitely work — the request will go to the supervisor whose department is indicated in the request — but this option has two drawbacks.
- If a department head changes, you’ll have to add the new person to every form where this routing is used. With routing by department, you add the new supervisor to the organization catalog once, and he or she will appear in every form.
- Adding every supervisor to the workflow (and setting conditions for each of them) is time-consuming, especially if there are many departments in the company.
Routing by Contact
Use the Contact field to configure flexible workflows. The form will go to whoever is indicated in this field. This can come in handy if a process doesn’t have a full-time person responsible for it.
A good example is service ticket handling. An operator receives a ticket, decides who on the support team should handle it, and indicates that person in the Contact field.
For the request to reach the responsible employee, you’ll need to go to the workflow editor and indicate the Contact field in the workflow step that comes after the operator. In our example, the field is called Person responsible.
You can add a Contact field to a table to indicate as many responsible employees as you need. This may be useful if you’re shipping different pieces of merchandise and different employees are responsible for different items. To add them to the workflow, indicate each employee in the table next to the item he or she is responsible for. Like the example above, put the name of the Contact field in the routing so that the form reaches the selected employees.
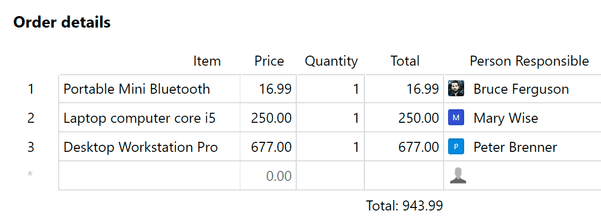
If the next shipment needs to be handled by other people, simply indicate them in the table without changing anything in the routing.
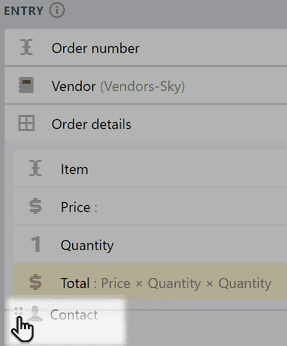
To be able to add people to a table, open the form’s template editor and simply drag the Contact field into the table.
Adding a new participant
Just like a regular task, you can add a new participant to a form at any stage.
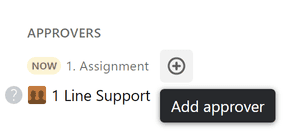
Note: after a form request has been submitted and started progressing along the preconfigured routing, by default, any of its participants can add approvers in the panel on the right of a request, as long as it's open. A new participant should approve a ticket to pass it to the next step.
These changes to the approval routing will apply only to that specific form request, while the preconfigured routing remains the default for all others. You can restrict regular task participants from changing the approvers in an already created task if needed. To do so, you need Administrator rights. Go into the Workflow editor.
Set a rule that only the Administrator can change the request's routing for this form. 
Monitoring requests closure
When a task is closed, it’s often important for its results to automatically be recorded and transferred to another form or system. You can assign a bot that will take the appropriate information and send it where it needs to go.
Say you’ve got a project approval that only a handful of top execs have access to. But the final result of this approval affects a wider cadre of colleagues. When the decision is finalized and the form is closed, the bot records the result and transfers it to the project’s main task.
If a task has been closed at the wrong step, the bot re-opens it and notifies the participants through the comment thread. The task closing bot reports on the task being closed to external systems like CRM, accounting, and so on.
To connect a bot, select it in the form routing settings and save the changes.
