QuickBooks Desktop integration
Pyrus comes with pre-built integration for QuickBooks Desktop, the popular business accounting software.
QuickBooks integration requires three short steps:
- Prepare the Vendors and GL codes catalogs in QuickBooks.
- Import vendors and GL codes from QuickBooks into Pyrus to avoid entering accounts and vendors manually. When the import is completed, you can choose the values from the dropdown menus and update them at any time.
- Configure automatic invoice export to QuickBooks. Approved invoices will be automatically uploaded to QuickBooks to avoid manual double-entry.
The step-by-step guide below will walk you through these steps for successfully configuring QuickBooks integration.
Prepare the Vendors and GL codes catalogs in QuickBooks
- Open QuickBooks 2010/Enterprise 10.0 or later. If you are using a different version, please contact us to learn if synchronization is possible.
- In the QuickBooks main menu, navigate to File -> Utilities -> Export -> Lists to IIF Files...

- In the Export dialog, select Vendor List and Chart of Accounts. Press OK.
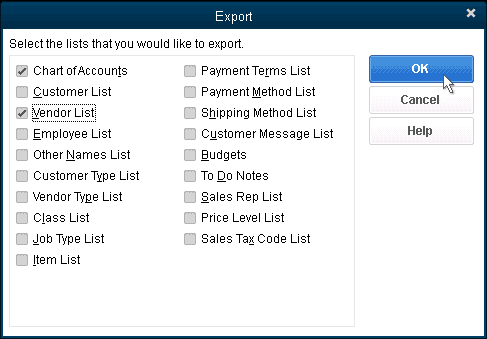 Note: You can select one checkbox if you need to import just one list in Pyrus.
 - Choose a filename, such as Data For Pyrus.IIF. Press Save. You will see a confirmation that the file with your data has been created. Click OK.

Import Vendors and GL codes to Pyrus
This feature allows you to copy a QuickBooks list to a Pyrus catalog. When a list changes in QuickBooks, you can run this function again in order to keep the associated Pyrus list synchronized.
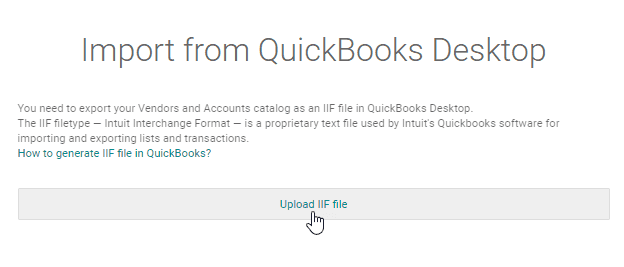
- In Pyrus, navigate to Forms -> AP Invoice and click on Configure.
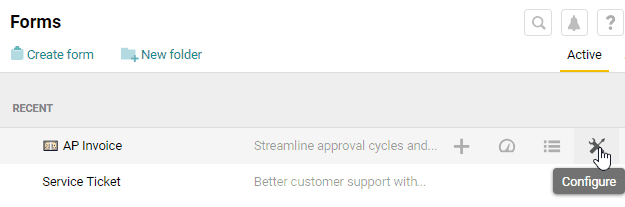
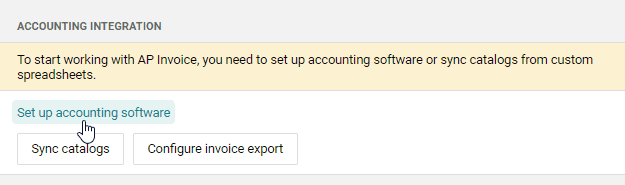
- Find the Accounting Integration section and click Set up accounting software.
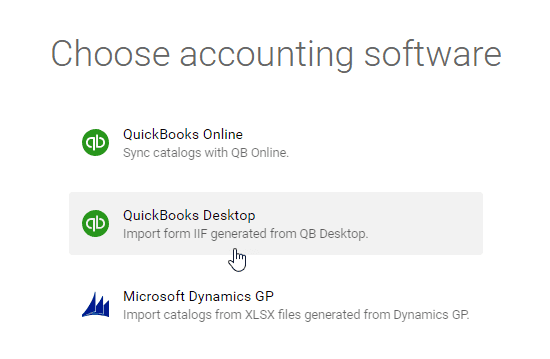
- Choose QuickBooks Desktop.
- Press Upload IIF file.
- Upload the file you just created and click Sync catalog.
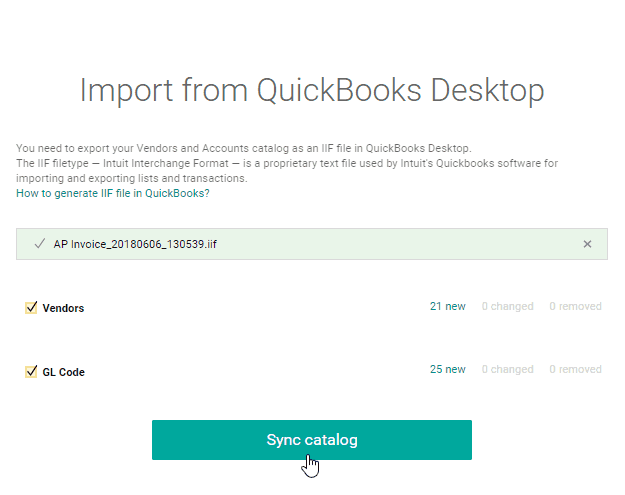
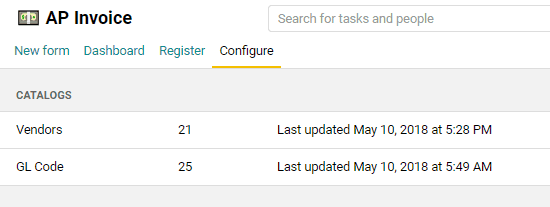
- After the sync, you will see updated data in the Catalogs section.
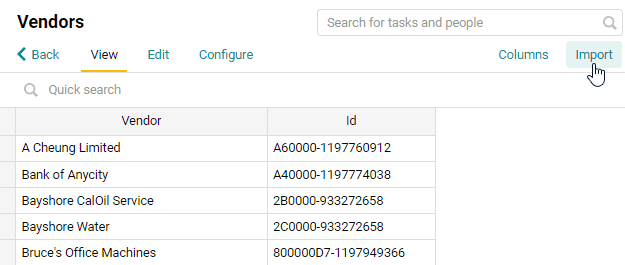
- You can sync catalogs as often as you like. Just export a new catalog from QuickBooks when you add a new vendor or an account in QuickBooks, then open the GL Code or Vendors catalog and click ** Import.**
Configure automatic invoice export to QuickBooks
- Install the latest version of Pyrus Sync right here. QuickBooks integration requires version 1.5.0.73 or later.
- Open Pyrus Sync and enter your Pyrus login email and security key. To learn how to obtain your Pyrus security key, see Installation and first run.
- In the Forms list, open AP Invoice.
- Switch to the Export tab.
- Click New Export.
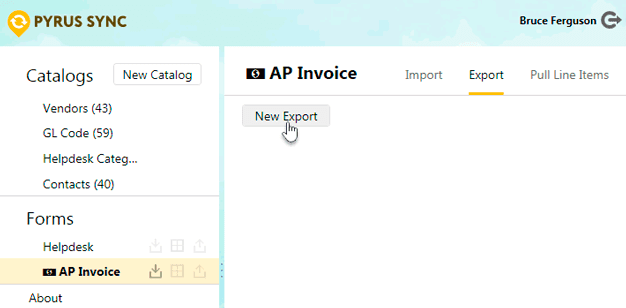
- Select QuickBooks Desktop.
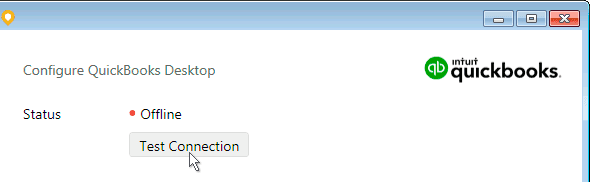
- Make sure that your system user has permission to access your company file in QuickBooks. Press the Test Connection button.
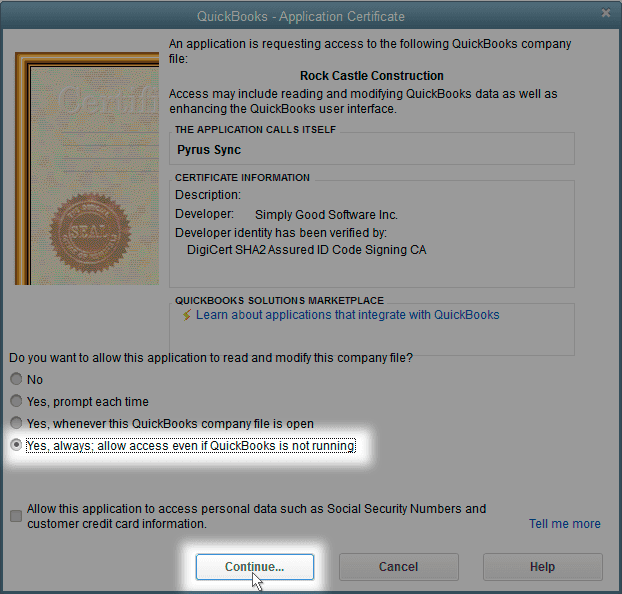
- If you configure the import for the first time, the QuickBooks - Application Certificate window appears. Give Pyrus Sync permission to access your company file and press Continue.
- In Pyrus Sync, press the Test Connection button again. You should see Connected to <your Company name> in the Status line and the Company file field updated.
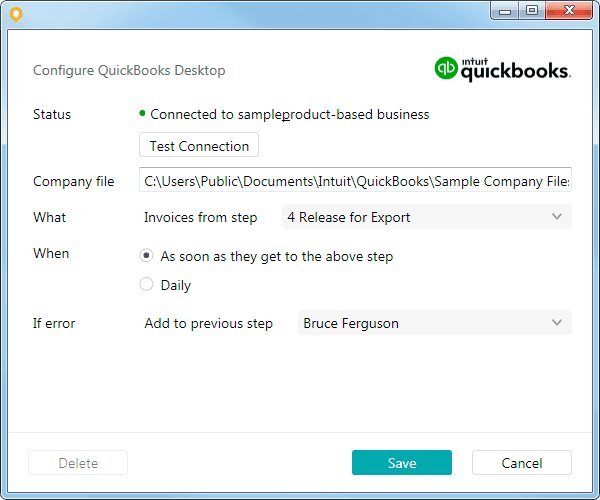
- Configure the remaining settings. You can specify which step will export the invoices into QuickBooks. Select Invoice from step in the What section and choose As soon as they get in the When section. Alternatively, you can choose Daily in the When section and specify the daily export time. When you finish configuring your settings, click Save. You will see the export configuration in the Export tab.

Configure automatic catalog synchronization
Pyrus Sync allows you to configure catalog synchronization with QuickBooks. It automatically checks for any changes in the GL Code and Vendors lists, then updates the Pyrus catalog as necessary. In this case, you don’t need to save the Vendor List and Chart of Accounts from QuickBooks and import them to Pyrus manually.
To synchronize a Pyrus catalog with the Vendor List, follow these steps:
- Open Pyrus Sync. In the Catalogs list, select the Vendors catalog and press the Configure button.
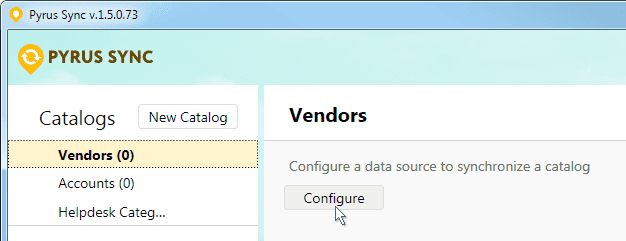
- Select QuickBooks in the Source line and press the Test Connection button.
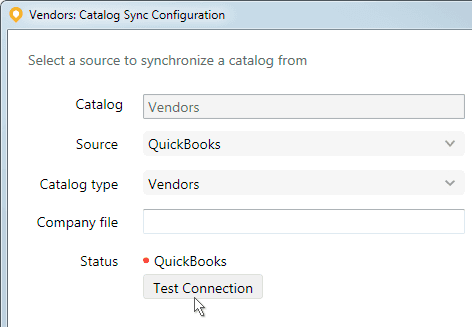 You should see QuickBooks: <your Company name> in the Status line and the Company file field updated. If an error appears, run QuickBooks and Pyrus Sync with the same privileges. (For example, run both apps as an Administrator.)
 - Press the Save button. You will see the switch next to the catalog name and its synchronization status.

To synchronize a Pyrus catalog with the Chart of Accounts list, follow the same steps.
Troubleshooting
Pyrus monitors that the synchronization is continuous and reports situations that might prevent or interrupt the successful exchange of data. In case of an error, the invoice will be reset to the previous step, a reviewer will be added to the task, and an error explanation will be added to the comments.
Below, you will find a list of potential issues and ways to address them.
- Required field is empty. Open the task and fill out the remaining required fields.
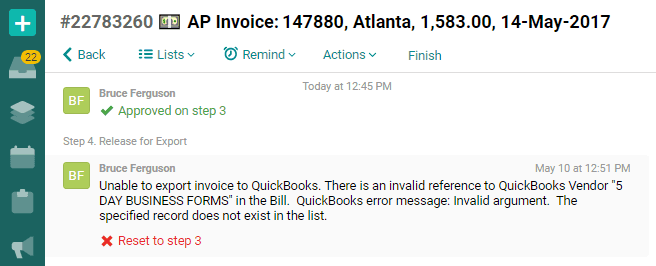
- Vendor or GL code not found in QuickBooks. Check if the catalogs are up to date. If not, re-import the GL codes and Vendors from QuickBooks into Pyrus.
- Possible invoice duplicate. Invoices with the same Vendor, Invoice Number, Invoice Date, and Invoice Total are potential duplicates. Check if there is an invoice with the same Invoice Number in QuickBooks; if so, archive the task.
- Unable to connect to QuickBooks. Make sure QuickBooks Desktop is running. Run QuickBooks and configure the Export in Pyrus Sync again.
- QuickBooks can’t start because it is already running. Run QuickBooks and Pyrus Sync with the same privileges. (For example, run both apps as an Administrator.)
Our software integrates with a variety of other software as well, so please contact us to make sure your needs are met.