Exporting a request registry
Organizations use Pyrus forms for the approval of invoices, price lists, and other documents. If Pyrus data needs to be used in accounting software or an ERP system, use the registry export function. The registry is saved as a CSV file, which can be used with other programs.
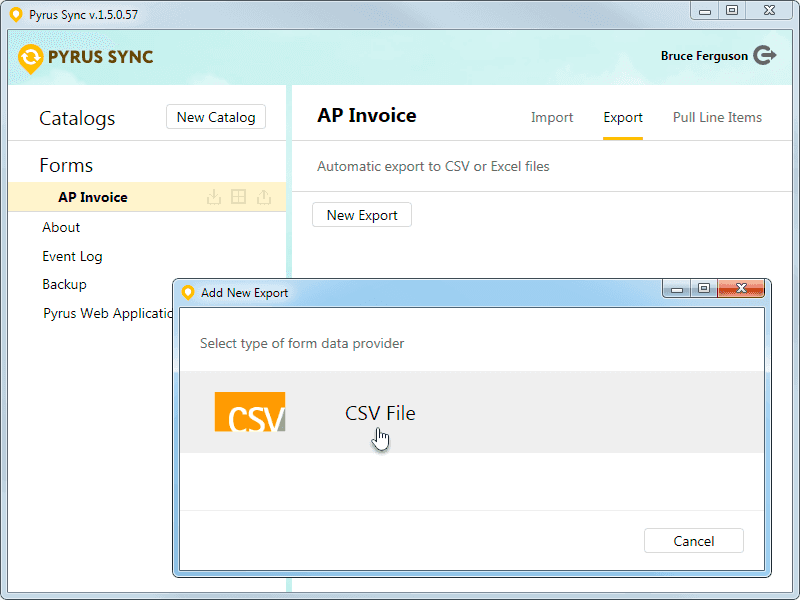
Suppose you want to send the information on all payments to your accounting program. Select the form you need from the Forms List in Pyrus Sync. In this example, we’d use an AP Invoice.
Pyrus Tip: Only form Administrator can set up a form export. Ask one of the existing form administrators to give you privileges if you can’t find the form you require in the list.
On the right side of the screen, go to the Export section and run the download by clicking New Export. In the window that opens, click CSV File.
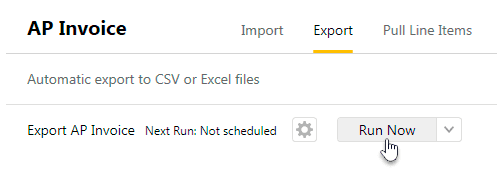
A window with standard JSON export settings will open. They correspond to a single export of the requests list, with all the fields. To save settings, click Save. To run the registry export, click Run Now.
The file will be saved in the Documents folder on the hard drive of your computer.
Scheduled export
Suppose you want to export approved expenses every day at 12:15. Add this parameter to the configuration settings. In the Export Settings Section, add {ScheduledTime: "12:15"}. The quotation marks here specify the export time.
{
 "Name": "AP Invoice Export",
 "Path": "C:\\Users\\bruce\\Documents",
 "Delimiter": ";",
 "ExportSettings":{
      "ScheduledTime": "12:15"
 }
}
If the export has to be carried out at regular intervals, such as every hour and a half, it can be similarly configured. In the Export Settings Section, add {ScheduledPeriod:}. The number after the colon is the time, in minutes, that passes between exports.
{
 "Name": "AP Invoice Export",
 "Path": "C:\\Users\\bruce\\Documents",
 "Delimiter": ";",
 "ExportSettings":{
     "ScheduledPeriod":90
 }
}
An example of a condition-based export
Sometimes only part of the information contained in a Pyrus form needs to be sent to an accounting program or other system, say, just the data on approved invoices or contracts. In this case, your registry export can be customized.
As an example, let's export a list of invoices that have already been approved (that is, they have been forwarded to the accounting department at the third stage) and are ready to be paid. In this case, we do not need to export all of the form’s fields. We only need the contractor's name, bank routing number, account number, and payment amount. After the export is completed, the invoices will be automatically archived in Pyrus.
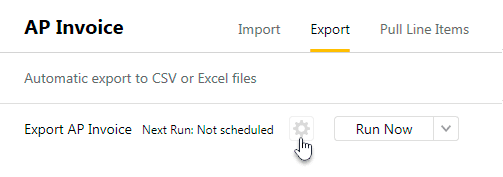
Let's change the default export settings. To open the configuration window, click the gear icon in the export line.
Add the step number to your parameters ("StepNo": 3) and set the rule to move on to the next step after export ("ApproveAfterExport": true).
{
   "Name": "AP Invoice Export",
   "Path": "C:\\Users\\bruce\\Documents",
   "Delimiter": ";",
   "StepNo": 3,
   "ApproveAfterExport": true,
   "ExportSettings": {}
}
Now, define the conditions. We only need requests where the value in the Payment Type field is Wire Transfer. If this condition is not met, the request will not be exported. Let’s add "ColumnMap": [] to the end, and also remove unnecessary fields from the exports file, leaving only the contractor’s name, their TIN, bank account number, and payment amount.
{
   "Name": "AP Invoice Export",
   "Path": "C:\\Users\\bruce\\Documents",
   "Delimiter": ";",
   "StepNo": 3,
   "ApproveAfterExport": true,
   "ExportSettings": {
       "ExportRules": [
           {
               "Conditions": [
                   {
                       "PyrusField": "Inventory",
                       "Values": [
                           "Inventory"
                       ]
                   }
               ],
               "ColumnMap": []
           },
           {
               "Conditions": [
                   {
                       "PyrusField": "Payment Type",
                       "Values": [
                           "Wire Transfer"
                       ]
                   }
               ],
               "ColumnMap": [
                   {
                       "CsvColumn": "Amount, USD",
                       "PyrusField": "Amount, USD"
                   },
                   {
                       "CsvColumn": "Contractor (new)",
                       "PyrusField": "Contractor (new)"
                   },
                   {
                       "CsvColumn": "TIN",
                       "PyrusField": "TIN"
                   },
                   {
                       "CsvColumn": "Bank Account No.",
                       "PyrusField": "Bank Account No."
                   },
                   {
                       "CsvColumn": "Price",
                       "PyrusField": "Price"
                   }
               ]
           },
           {
               "ColumnMap": []
           }
       ]
   }
}
Save the parameters. Now you can start exporting the registry.
Export parameters
Pyrus Sync data export is configured in JSON, a text format for storing and transferring structured data.
There are several rules and conditions that apply to export settings.
- All fields, both in Pyrus form template for which you are setting the export and in the CSV file, should have unique names. The system does not take into account the spaces at the beginning and or end of the name, but the names are case-sensitive (field names "Invoices" and "invoices" are treated as different names).
- To configure the integration, you need to have a form manager’s rights. Any form participant can run an export.
- The export engine is able to export filetype fields. However, the files attached to the task outside of the form fields cannot be exported.
The following parameters can be used to configure export settings:
- Name: a mandatory field for setting a name. For example:
"Name": "AP Invoice Export",
- Path is a mandatory field. It’s the path to the CSV file with export results:
"Path": "C:\\pyrus",
- Delimiter is an optional field. It is a column separator character for CSV files. If not specified, it is set automatically depending on the computer settings.
"Delimiter": ";",
- Encoding is an optional field that specifies the CSV file encoding. If not specified, it uses CP1251. The full list of encodings can be found here. For example, changing encoding to UTF-8 looks like this:
"Encoding": "utf-8",
- ShowUserIds is an optional field that specifies the list of users who can see configuration settings and run an export. If not specified, all form participants have export privileges. The form manager can always run an export, even if his user ID is not specified. To define which employees do this, enter their IDs separated by commas, for example:
"ShowUserIds": [123183, 123193],
You can see a user's ID in the address bar on his or her profile page. 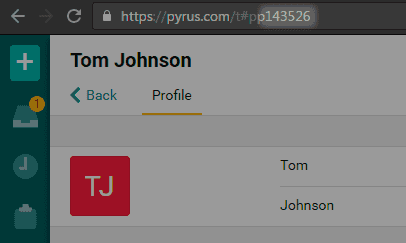
- ExportSettings is an optional field that specifies the export rules.
- ExportRules is an optional field for setting the conditions that must be met for a task to be processed. Each condition has two mandatory elements: a list of conditions (Conditions) and display rules (ColumnMap).
Setting export rules in the ExportSettings section:
- ScheduleUserIds is an optional field with the list of user IDs to run a scheduled export. Write the IDs of employees who are allowed to run one, separated by a comma. If IDs are not specified, a scheduled export can run on behalf of all users. Let’s assume that you have set up a scheduled export for a form, but did not specify the ScheduleUserIds parameter. If, for example, three employees started Pyrus Sync and have access to this form, all three will have the scheduled export running.
- ScheduledTime is an optional field that specifies the scheduled launch time. It is specified inside quotation marks. Minutes are separated from hours by a colon. For example, "12:24".
- ScheduledPeriod is an optional field that sets the periods between export (N minutes, where N is an integer). For example, if you want to sync every 15 minutes, you have to write: 15, without quotation marks. If a schedule has been specified via ScheduledTime, the system will ignore this field.
- ScheduleResultUser is an optional field that defines whom the system will notify upon export results. By default, the user who configured the export in Pyrus Sync will be notified.
- StepNo is an optional field that specifies the step number. If specified, only forms from a designated step will be exported. If not, all forms are exported.
- ApproveAfterExport: true is an optional field. If specified, Pyrus Sync will mark the task as approved on its behalf, following the export. If all users of the current step have already approved the task, it will move to the next step.
- CloseAfterExport: true is an optional field. If specified, Pyrus Sync will close the task after export, provided that the user running Pyrus Sync has the right to close the task on this form.
- FileName is the filename template for saving export results. By default, this is a string containing the form name, user name, and export date and time, with .csv extension.
Setting the conditions for processing and exporting tasks with ExportRules:
If you want to export only the tasks matching certain criteria, say, to run different types of exports for different types of tasks, then this section will be invaluable. Every rule (ExportRules) has two mandatory elements: a list of conditions (Conditions) and display rules (ColumnMap). If the form has a Table type field, export rules will be first applied to a task with such a field as a whole, and then to each row in the table.
Conditions element
- PyrusField is a mandatory field that sets the form field name.
- Values is a mandatory field with the list of PyrusField values.
- IsNotNull: true means that the rule is applied when the PyrusField field is filled in.
ColumnMap element: Here you specify the list of columns to be included in the export file. You can also customize which Pyrus field writes data to which column of the CSV file. If this section is present, the list should contain at least one element. It is important to remember that the last element of the list should be ColumnMap[]. Otherwise, the export file will not include all necessary data.
- PyrusField is the name of the form field.
- CsvColumn is the name of the corresponding column of the CSV file. If this field is not specified, the name of the column in the file will be the same as the PyrusField value.