Configuring an SAML SSO integration with ADFS
General info
SSO (Single sign-on) – a one-time login technology that enables users to log in to several apps with a single set of account data.
SAML (Security Assertion Markup Language) – an open standard for transferring ID data between cloud systems. It is usually used in large organizations with a relevant user base, active security policies, and so on. The SAML makes accessing content in the service safer and more easily monitored.
ADFS (Active Directory Federation Services) – a Windows Server component that facilitates the login function for providers on web apps.
The Pyrus integration with ADFS SAML services enables users without accounts to log in to Pyrus using your corporate system’s login and password.
Preliminary requirements
To set up the Pyrus integration with ADFS through SAML, you will need:
- a set up and configured ADFS server (supported versions ADFS 2.0, 2.1, 3.0, 4.0, 5.0);
- a Pyrus organization that can log in using SAML.
Note: these instructions are for Windows Server 2016. The steps may differ for other versions of Windows.
Setting up the integration with SAML in Pyrus
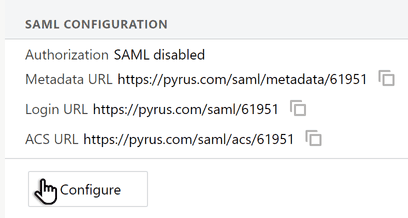
Open the Security tab in the Organization section.

At the bottom of the page, in the SAML Settings section, hit Configure. A window with the SAML provider’s settings will open.

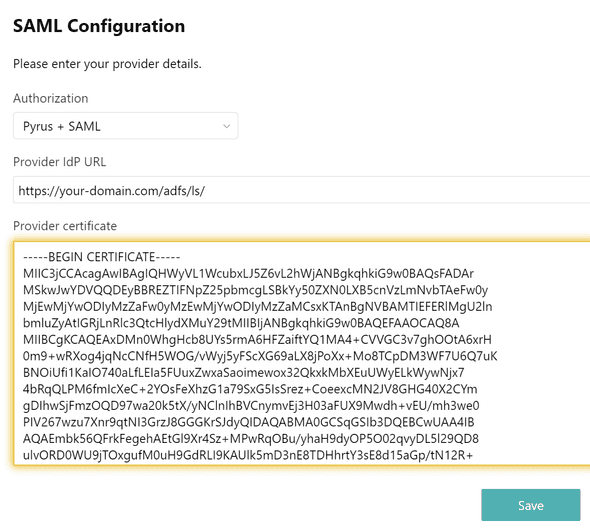
In the Authorization field, select one of the suggested values:
- Pyrus + SAML – includes simultaneous login through standard Pyrus mechanisms (a one-time code, a
password, etc.) and SAML; - SAML – includes login only with SAML;
- SAML disabled – turns off your ability to log in with SAML.
- Pyrus + SAML – includes simultaneous login through standard Pyrus mechanisms (a one-time code, a
In the Provider IdP URL field, enter the URL of your ADFS server (e.g. https://your-domain.com/adfs/ls/).
In the Provider certificate field, enter the line presentation of the certificate for checking the digital signature in BASE64 format (you must extract the certificate from ADFS with the Token-signing type). Hit Save.
Copy the Metadata URL link, then open it. Save the Service Provider’s metadata file in .xml format. You will need it when setting up the ADFS server.
System behavior after SAML configuration
When users log in to Pyrus with SAML, users who are not in the system are created automatically. When users who exist in the system log in with SAML, their data is automatically updated.
Note: SAML does not provide for automatic deletion or blocking of users at the app end when they are deleted or blocked on the Identity Provider end. If you delete or block a user in the Active Directory, you should also manually block or delete them in Pyrus.
There are also alternate mechanisms for syncing users in Pyrus for the Active Directory and G Suite.
Establishing relying party trust
ADFS requires relying party trust foreach Service Provider who will be using ADFS to log in.
To establish relying party trust for the federation, do the following:
- Log in to your ADFS server and open Server Manager.
- Open the ADFS: Tools > ADFS Management control panel.
- From the list of actions, select Add Relying Party Trust.
- A helper window will open. On the first page, select Claims aware and press Start.
- Select Import data about the relying party from a file and specify the metadata file received at the previous step, when configuring the SAML integration settings in Pyrus. Hit Next.
- Enter a name, such as “Pyrus,” then hit Next.
- On the next page, you can select who will have access to authentication through that federation. The default selection is Permit for everyone, which allows all users to log in.
- On the Ready to Add Trust page, check the entered data and hit Close.
Configuring Claims Mapping
When the ADFS authenticates the user, it sends an SAML message to the SP, confirming a successful authentication. To correctly identify the user, set configure the user’s data to correspond to the SAML message.
In the ADFS control panel in the Relying Party Trusts block, right-click on the relying party trust created early and select Edit Claim Issuance Policy.
In the window that opens, press Add Rule.
Select Send Claims Using a Custom Rule and hit Next.
In the Claim Rule Name field, enter a rule name, such as “CustomRule.” In the Custom Rule field, specify the rule:
 c:[Type == "http://schemas.microsoft.com/ws/2008/06/identity/claims/windowsaccountname", Issuer == "AD AUTHORITY"]
  => issue(store = "Active Directory", types =
 ("http://schemas.xmlsoap.org/ws/2005/05/identity/claims/nameidentifier",
 "http://schemas.xmlsoap.org/ws/2005/05/identity/claims/emailaddress",
 "http://schemas.xmlsoap.org/ws/2005/05/identity/claims/givenname",
 "http://schemas.xmlsoap.org/ws/2005/05/identity/claims/surname",
 "http://schemas.xmlsoap.org/ws/2005/05/identity/claims/otherphone"), query =
 ";userPrincipalName,mail,givenName,sn,telephoneNumber;{0}", param = c.Value);
Hit Finish.
Notes: The "http://schemas.xmlsoap.org/ws/2005/05/identity/claims/nameidentifier" and "http://schemas. xmlsoap.org/ws/2005/05/identity/claims/emailaddress” fields are required.
Press OK.
Conclusion
After successfully configuring SAML SSO sign in, users of an organization can log into Pyrus using the authentication data they already have.